canari.maltego.message - Maltego Messaging Objects
New in version 3.0.
The canari.maltego.message module provides the complete implementation of all the Maltego transform messaging
objects. These objects are used to deserialize Maltego transform requests and serialize Canari transform responses for
both local and remote transforms. For example, the request and response objects that gets passed into the
Transform.do_transform() method are instances of
MaltegoTransformRequest and MaltegoTransformResponse,
respectively.
All Maltego messaging objects are subclasses of the MaltegoElement super class, which adds
support for two arithmetic operations:
| Operations | Meaning |
|---|---|
p += c |
Add a child object (c) to the parent object (p) |
p + c |
Same as += but it can be chained with multiple child objects. |
Here’s an example demonstrating the use of these two arithmetic operations on the response object:
from canari.maltego.transform import Transform
from canari.maltego.entities import Phrase, Person

class HelloWorld(Transform):

    input_type = Person

    def do_transform(self, request, response, config):
        person = request.entity
        response += Phrase('Hello %s!' % person.value)
        response = response + Phrase('Hello Mr(s) %s!' % person.lastname) \
                            + Phrase('Hello %s!' + person.firstname)
        return response
Finally, each messaging object can be separately serialized and deserialized to and from XML using the render() and
parse() methods:
>>> from canari.maltego.entities import Phrase
>>> print (MaltegoTransformResponseMessage() + Phrase('test')).render(pretty=True)
<?xml version="1.0" ?>
<MaltegoTransformResponseMessage>
    <UIMessages/>
    <Entities>
        <Entity Type="maltego.Phrase">
            <Value>test</Value>
            <Weight>1</Weight>
        </Entity>
    </Entities>
</MaltegoTransformResponseMessage>
>>> MaltegoTransformResponseMessage.parse('<MaltegoTransformResponseMessage/>')
<canari.maltego.message.MaltegoTransformResponseMessage object at 0x10e99e150>
However, if you’re a transform developer you will never really need to use the render() or parse() methods
as they are primarily used by the dispatcher, canari debug-transform, and plume
transform runners.
Maltego Request and Response Objects
The MaltegoTransformRequestMessage and MaltegoTransformResponseMessage represent the parent container
for Maltego request and response messages, respectively. When a transform is executed, Canari automatically deserializes
a request into a MaltegoTransformRequestMessage object and creates an empty
MaltegoTransformResponseMessage, which it then passes to Transform.do_transform().
Maltego transform request messages can be created using either the factory method parse(), which accepts an XML
string whose root element is the <MaltegoTransformRequestMessage> tag, or by calling the empty constructor.
-
class
canari.maltego.message.MaltegoTransformRequestMessage(**kwarg)¶ Return a new Maltego transform request message with no child elements. Each Maltego transform request message comes with the following read-only attributes:
-
limits¶ A
Limitsobject which contains the soft and hard limits for the number of entities Maltego would like returned.One can access the soft and hard limits of a
requestobject by doing the following:>>> print 'Transform hard limit=%s, soft limit=%s' % (request.limits.soft, request.limits.hard) Transform hard limit=500, soft limit=5000
Note
limitsdo not apply to local transforms since the local transform adapter in Maltego does not transmit this information.
-
parameters¶ In local transform execution mode,
parametersis a list of extraneous command line arguments not handled by the Canari dispatcher. This is useful in scenarios where you want to use command line arguments to manage the behavior of a transform, for example:# transform executed using 'dispatcher foo.transforms.HelloWorld -u Bob' def do_transform(self, request, response, config): """If '-u' detected in command line arguments make entity value all upper case.""" if '-u' in request.parameters: response += Phrase('Hello %s!' + request.entity.value.upper()) else: response += Phrase('Hello %s!' + request.entity.value) return response
In remote transform execution mode,
parametersis a dictionary of additional transform fields, keyed by their names. Transform fields are typically used to communicate additional transform parameters. For example, many commercial transforms use the transform field to transmit API keys. Alternatively, one can use transform fields to alter transform behaviour - just like in our local mode example. The following is an example of a custom transform that expects an API key:# ... def do_transform(self, request, response, config): fields = request.parameters if 'my.license' not in fields or not valid_api_key(fields['my.license'].value): raise MaltegoException('Invalid API key! Send cheque!', code=600Å) response += Phrase('Hello %s!' + request.entity.value) return response
Note
If you intend to use a transform package in both local and remote mode, make sure to check Canari’s operating mode prior to accessing
parameters. Seecanari.modefor more information.
-
entity¶ The
Entityobject to be processed by the Canari transform. The entity object’s type is determined by the value of theTransform.input_typeattribute. If Transform.input_type is not set explicitly, thenentitywill return an entity of typeUnknown. For example, aPersonentity will always be returned in the following transform:class HelloWorld(Transform): # Ensure request.entity returns a Person object input_type = Person def do_transform(self, request, response, config): person = request.entity response += Phrase('Hello %s!' + person.fullname) return response
-
MaltegoTransformResponseMessage can be created in the same way as our request objects; either by using
parse() or by using the constructor explicitly.
-
class
canari.maltego.message.MaltegoTransformResponseMessage(**kwarg)¶ Return a new Maltego transform response message object with no child elements. The various attributes of the response can also be manipulated using regular list operations via these attributes:
-
messages¶ A list of
UIMessageobjects that contain user interface messages to be displayed in Maltego’s “Transform Output” pane or in a dialog window. For example, let’s say we wanted to display a fatal message:# ... def do_transform(self, request, response, config): response += UIMessage("This transform is not implemented yet!", type=UIMessageType.Fatal) return response
This would result in the following message box appearing in Maltego:
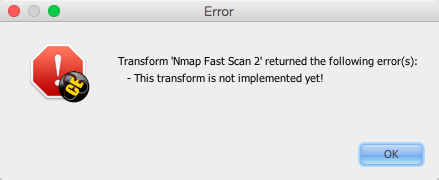
Fatal UI message appearance
See also
UIMessagefor an overview of the different message types and how they are rendered in Maltego’s UI.
-
entities¶ The list of
Entityobjects to be returned as transform results to the Maltego UI. Entities can be added to a response message by using the+=operator, like so:# ... def do_transform(self, request, response, config): response += Location('Brooklyn') return response
Or by using the
+operator to chain multiple entity results in one line, like so:# ... def do_transform(self, request, response, config): return (response + Location('Brooklyn') + Location('Broadway'))
-
Communicating Exceptions
Using MaltegoExceptionResponseMessage objects, a transform can communicate an error state back to the Maltego
user. Canari generates a Maltego exception object if an exception is raised during transform execution. There are two
different behaviours when it comes to reporting exceptions. If a transform raises a MaltegoException then the
exception message is what’s communicated to the user. However, other exception types will render a message box with
full stack trace details. Here’s a visual example:
# ...
def do_transform(self, request, response, config):
    raise MaltegoException('Just pooped!')
Results in the following dialog box:
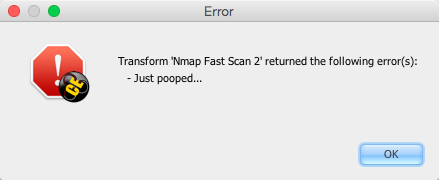
MaltegoException exception appearance
Whereas:
# ...
def do_transform(self, request, response, config):
    import foobar # non-existent module
Results in the following dialog box:
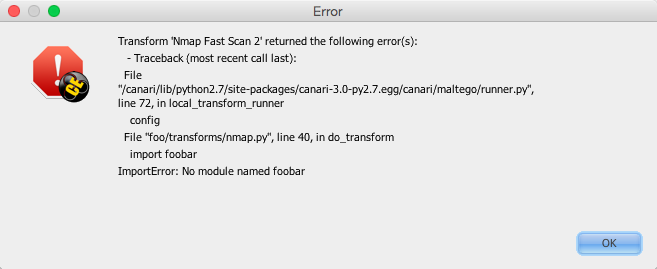
Non-MaltegoException exception appearance
Warning
Users who are security conscious may find this behaviour undesirable since full stack traces often disclose internal information such as file system paths, and module names. Support for cross-referencable logs and generic error messaging will appear in Canari v3.1.
Communicating Diagnostic Information
A second form of communicating status or diagnostic information is via the use of UIMessage objects. UI
messages either appear in the “Transform Output” pane (usually at the bottom) or as dialog message boxes depending on
the message type assigned to them. For your convenience, Canari has defined all the different UI message types as class
attributes in UIMessageType:
-
class
canari.maltego.message.UIMessageType¶ -
Fatal¶ Fatal errors are communicated to Maltego users using a dialog message box.
-
Partial¶ Partial errors are communicated to Maltego users in the “Transform Output” pane and are orange in color.
-
Inform¶ Informational errors are communicated to Maltego users in the “Transform Output” pane but are not colored.
-
Debug¶ These errors do not appear to be displayed anywhere in the Maltego user interface. Instead they may appear in debug logs.
-
Communicating diagnostic information to a Maltego user is simple. Simply, use the += or + operators to add
a UIMessage object to a response object, like so:
# ...
def do_transform(self, request, response, config):
    import time
    response += Phrase('Hello sleepy head!')
    time.sleep(3)
    response += UIMessage("This transform took 3 seconds to complete.", type=UIMessageType.Inform)
    return response
The UIMessage accepts two arguments, msg and type.
-
class
canari.maltego.message.UIMessage(message[, type=UIMessageType.Inform])¶ Parameters: - message (str) – The message to communicate to the Maltego user.
- type (UIMessageType) – The type of message to communicate to the user (default:
UIMessageType.Inform).
Values for
messageandtypecan also be set via these attributes:-
type¶ The type of message that will be communicated. Valid values for this attribute are defined in
UIMessageType.
-
message¶ The message to communicate to the user.
Local transforms also support real-time diagnostic messaging. See debug() and
progress() for more information.
Using and Defining Maltego Entities
An entity in Maltego is comprised of several elements:
- A default entity value: the default property which appears under the Maltego entity on the graph.
- Fields: extra properties belonging to an entity that get passed to transforms as input. These appear in the “Properties View” pane in Maltego. The default entity value is also represented as a property.
- Labels: read-only information that’s used to display additional information about an entity. Labels do not get used as transform input. Labels appear in the “Detail View” pane in Maltego.
- Notes: additional notes that are associated with a particular entity. Like labels, notes are not used as transform input. Notes can be viewed in the “Entity Viewer” or on the graph as a call-out.
- Link and Entity Decorations: usually set by a transform on all its output entities to decorate the look and feel of a link (i.e. line thickness, style, etc.) or entity (i.e. bookmarking, icons, etc.). Decorations appear directly on the graph.
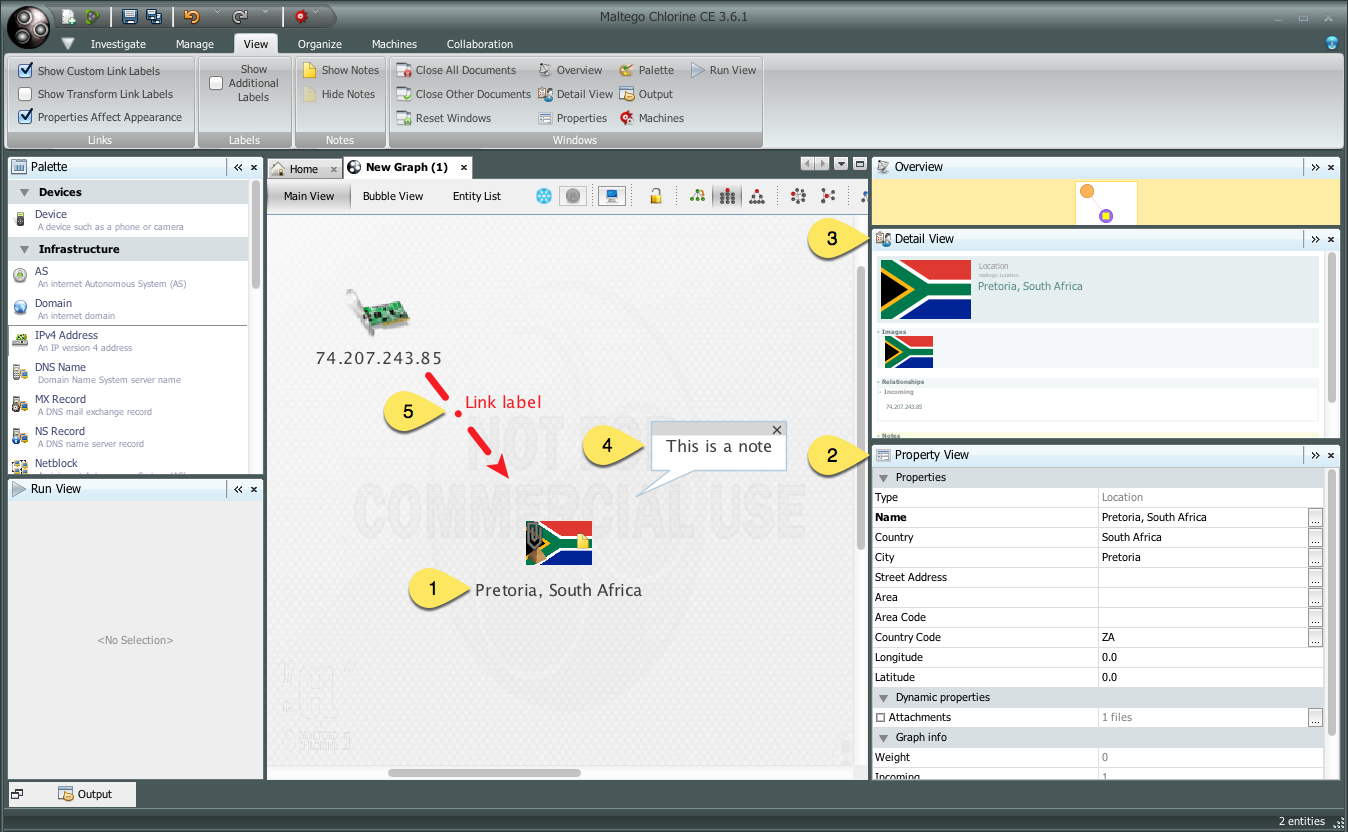
Maltego entity composition
Canari uses the Entity type to define Maltego entities programmatically. All Canari entities are subclasses of
the Entity type. Entity objects are used in both request and response messages. Canari comes with a
list of pre-defined entity types that correspond to the built-in types in Maltego. These types can be found in
canari.maltego.entities. Defining a custom entity in Canari is as simple as this:
>>> from canari.maltego.message import Entity, StringEntityField
>>> class Threat(Entity):
...    name = StringEntityField('threat.name', is_value=True)
...    country = StringEntityField('threat.country')
...
>>> t = Threat('Cheese', country='Switzerland')
>>> print 'Detected threat %r from %s' % (t.name, t.country)
Detected threat 'Cheese' from Switzerland.
In the example above we are defining a custom entity of type Threat with two string entity fields, name
and country. The is_value keyword argument in our name entity field definition instructs Canari that
name is the entity’s default value. As a result, we can set the value of name via the entity’s first argument in
the constructor. Alternatively, we could have completely omitted the definition of name since all entity objects
have an entity value attribute. All other entity fields can be set using a keyword argument that matches the
attribute’s name.
Entity objects can be instantiated in the following manner:
-
class
canari.maltego.message.Entity(value='', **kwarg)¶ Parameters: value (str) – the default entity field value. You can also pass the following additional keyword arguments:
Parameters: - type (str) – The entity’s type name (default:
<package name>.<class name>). - value (str) – The entity’s default entity field value.
- weight (float) – The entity’s weight value from 0.0 to 1.0. Useful for transforms that return ranked search result entities from search engines.
- icon_url (str) – The entity’s icon URL. Maltego supports the built-in Java URL protocol schemes
(
file://,http://,https://, etc.). - fields (list) – A list of entity fields, of type
Field, to be added to the entity. - labels (list) – A list of entity labels, of type
Label, to be added to the entity.
The following attributes are also inherited by all the subclasses of the
Entitytype:-
value¶ The default entity value (what appears under the entity’s icon in the Maltego graph) as a string.
-
icon_url¶ A string containing a valid URL to an image (i.e.
file:///tmp/foo.png,http://bar.com/foo.gif, etc.) to be used as the entity’s icon.
Maltego entity icon
-
labels¶ A dictionary of
Labelobjects keyed by their names. Labels appear in the “Detail View” pane in the Maltego GUI and are often used to display text fragments, additional information, or hyperlinks that a user can click on for more information.Note
Labels are not transmitted with input entities on transform requests. If you wish to include information from a label in a transform request, then that information should reside in an entity field.
Adding a label to an entity is as easy using the
+=operator or passing a list ofLabelobjects to the entity constructor, like so:>>> t = Threat('Cheese', country='Switzerland', labels=[Label('Cheese Type', 'Swiss')]) >>> t += Label('Cheese Age', '12 years')
Which would result in the following content being rendered in the “Detail View” pane in Maltego’s UI:
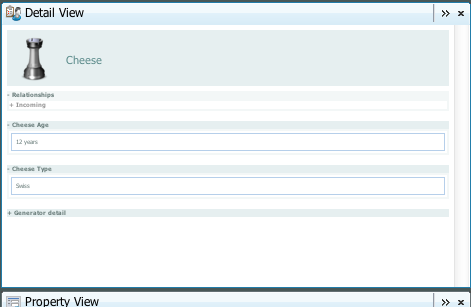
Entity labels in “Detail View”
-
fields¶ A dictionary of
Fieldobjects keyed by their names. Entity fields are read-write properties that appear in the “Properties View” pane in the Maltego GUI and are used as input for transform requests.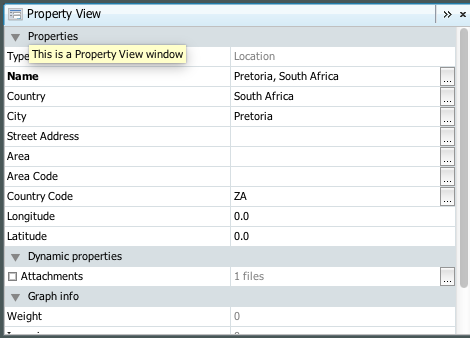
Entity fields in “Properties View”
-
notes¶ A string containing additional notes that can be attached to a Maltego entity. You can set a note in the following manner:
>>> Threat('Cheese', country='Switzerland', note='This is a note') # or
>>> t = Threat('Wine', country='Italy')
>>> t.note = 'This is another note'
The following figure demonstrates the appearance of an entity note in Maltego:
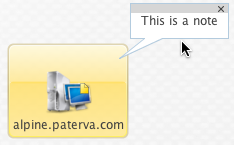
Maltego Entity Note
Note
Entity notes are not transmitted as transform input. Consider adding an additional entity field that encapsulates the information in your notes if you wish to pass it to your transforms as input.
-
bookmark¶ Determines whether an entity should be marked with a colored star. Can be one of the following values:
Value Appearance Bookmark.NoColor (default)
Bookmark.Cyan
Bookmark.Green
Bookmark.Yellow
Bookmark.Orange
Bookmark.Red
Here’s an example of how to set a bookmark:
>>> from canari.maltego.message import Bookmark
>>> Threat('Cheese', country='Switzerland', bookmark=Bookmark.Red) # or
>>> t = Threat('Wine', country='Italy')
>>> t.bookmark = Bookmark.Cyan
The following figure demonstrates the appearance of an entity bookmark in Maltego:

Maltego entity bookmark
-
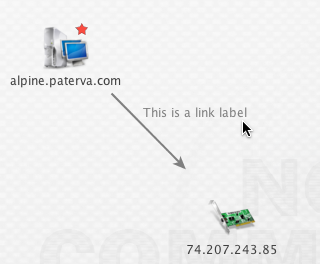
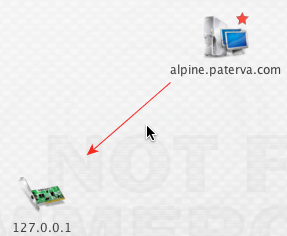
link_label¶ A string attribute that adds a label to the link that connects the parent and child entity. Like notes, link labels can be set via the
link_labelkeyword argument in the constructor or by accessing thelink_labelattribute. Here’s an example of the link label in action:# ... def do_transform(self, request, response, config): return (response + IPv4Address('74.207.243.85', link_label='This is a link label'))
This is what it would look like in Maltego:
Link label appearance
Link labels can be shown or hidden by setting the
link_show_label.
-
link_show_label¶ Determines whether or not the link label will be shown based on the following values:
Value Meaning LinkLabel.UseGlobalSettingThe visibility of the link label will depend on the global setting. LinkLabel.ShowThe link label will be visible on the graph. LinkLabel.HideThe link label value will be set but will not be visible on the graph. The global setting can be found under the “View” ribbon within the “Links” settings group.
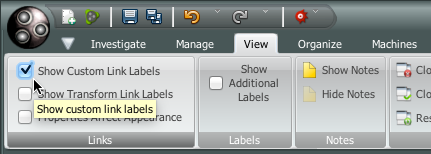
Maltego global link label visibility setting
Here’s an example of the link visibility setting in action:
from canari.maltego.message import LinkLabel
# ...
def do_transform(self, request, response, config):
    return (response + IPv4Address('74.207.243.85', link_show_label=LinkLabel.Hide))
-
link_style¶ Dictates the appearance of the link’s line, which can be one of the following choices:
Value Appearance LinkStyle.Normal (default)
LinkStyle.Dashed
LinkStyle.Dotted
LinkStyle.DashDot
Here’s an example of the link style in action:
from canari.maltego.message import LinkStyle
# ...
def do_transform(self, request, response, config):
    return (response + IPv4Address('74.207.243.85', link_style=LinkStyle.DashDot))
This is what it would look like in Maltego:
Link style appearance
-
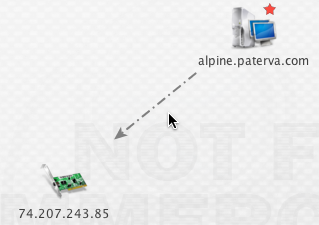
link_color¶ Dictates the color of the link connecting the parent and child entities. The link color is limited to the following values:
Value Appearance LinkColor.Black
LinkColor.DarkGray (default)
LinkColor.LightGray
LinkColor.Red
LinkColor.Orange
LinkColor.DarkGreen
LinkColor.NavyBlue
LinkColor.Magenta
LinkColor.Cyan
LinkColor.Lime
LinkColor.Yellow
LinkColor.Pink
Here’s an example of the link color in action:
from canari.maltego.message import LinkColor
# ...
def do_transform(self, request, response, config):
    return (response + IPv4Address('74.207.243.85', link_color=LinkColor.Red))
This is what it would look like in Maltego:
Maltego link color
-
link_thickness¶ Dictates the thickness of the link connecting the parent and child entities. Valid values range from
0to5. The greater the number, the thicker the link and vice versa. Here’s an example of the link thickness in action:# ... def do_transform(self, request, response, config): return (response + IPv4Address('74.207.243.85', link_thickness=5))
This is what it would look like in Maltego:
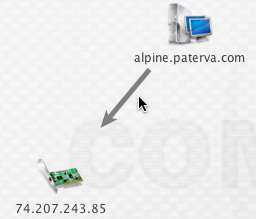
Maltego link thickness
- type (str) – The entity’s type name (default:
Defining Entity Fields
Entity fields can be added to an entity in two ways, dynamically and statically. The dynamic approach is recommended in
cases where an entity field is not part of the standard entity’s definition. For example, if we wanted to attach an
additional field, “Tracking Code”, to Maltego’s built-in WebSite entity, we can do so like this:
>>> from canari.maltego.entities import WebSite
>>> w = WebSite('www.google.com')
>>> w += Field('tracking.code', '123456789', display_name='Tracking Code')
However, if we were looking to use the pre-defined entity fields, defined for a particular entity, we can simplify our code by defining entity field properties in Canari. Entity field properties provide a simple and clean interface to get and set values of entity fields in a Pythonic way:
>>> from canari.maltego.message import *
>>> class MyEntity(Entity):
...     foo = StringEntityField('foo')
...
>>> e = MyEntity()
>>> e.foo = 1
>>> e.foo
'1'
>>> MyEntity(foo=2).foo
'2'
See also
See Field for more information on constructing dynamic fields.
Canari comes with 11 pre-defined entity field types to aid with entity object interaction in your transforms. These
entity field types take care of marshalling field data into the appropriate type (i.e. from string to integer, or float,
etc.). This is useful for performing rudimentary input validation in your transforms and can ensure that the data is
properly formatted for Maltego as well. For example, the EnumEntityField can be used to ensure that an entity
field’s value is restricted to a limited set of acceptable values:
>>> class Car(Entity):
...     fuel = EnumEntityField('car.fuel.type', choices=['diesel', 'petroleum'])
...
>>> toyota = Car(fuel='diesel')
>>> volvo = Car(fuel='water')
Traceback (most recent call last):
    ...
ValidationError: Invalid value ('water') set for field 'car.fuel.type'. Expected one of these values: ['diesel', 'petroleum'].
All entity field types with exception to the StringEntityField raise a ValidationError if an invalid
value is set. Input validation is also performed when retrieving field values from input entities as well.
Note
Input validation is not immediately performed on input entity fields. Instead, input validation checks are performed when a transform attempts to access a strong-typed input entity field.
Validation errors appear in a user friendly manner within the Maltego GUI, like so:
Input validation error
The following entity field types are supported in Canari:
| Entity Field Type | Accepted Types |
|---|---|
StringEntityField |
All (if not str, then result of object.__str__() is used). |
EnumEntityField |
Values defined in list of choices. |
IntegerEntityField |
int |
BooleanEntityField |
bool |
FloatEntityField |
float |
LongEntityField |
long |
DateTimeEntityField |
datetime |
DateEntityField |
date |
TimeSpanEntityField |
timedelta |
RegexEntityField |
str that contains a regex pattern used in re.match(). |
ColorEntityField |
str that contains RGB color code (i.e. '#FF0000') |
All entity field types are subclasses of StringEntityField and can be constructed in the following manner:
-
class
canari.maltego.message.StringEntityField(name, **extras)¶ Parameters: name (str) – The “Unique property name” of the entity field in Maltego. The constructor also accepts the following keyword arguments:
Parameters: - description (str) – The “Description” of the entity field in Maltego.
- display_name (str) – The “Property display name” of the entity field in Maltego.
- matching_rule (MatchingRule) – The default matching rule for the entity field (default:
MatchingRule.Strict). - alias (str) – The alias for the “Unique property name”. Used for backwards compatible entity fields.
- error_msg (str) – The custom error message that gets displayed when a
ValidationErroris raised. - is_value (bool) –
Trueif the property is the main property, elseFalse(default). - decorator (callable) – A
callableobject (function, method, etc.) that gets called each time the entity field is set. Useful for automating entity decoration, such as applying an entity icon based on the value of the field, or deriving the value of a field based on another field’s value.
The following figure illustrates the mapping between the entity field’s
name(2),description(3),display_name(4) keyword arguments for aStringEntityFieldand the form fields in Maltego’s entity field wizard: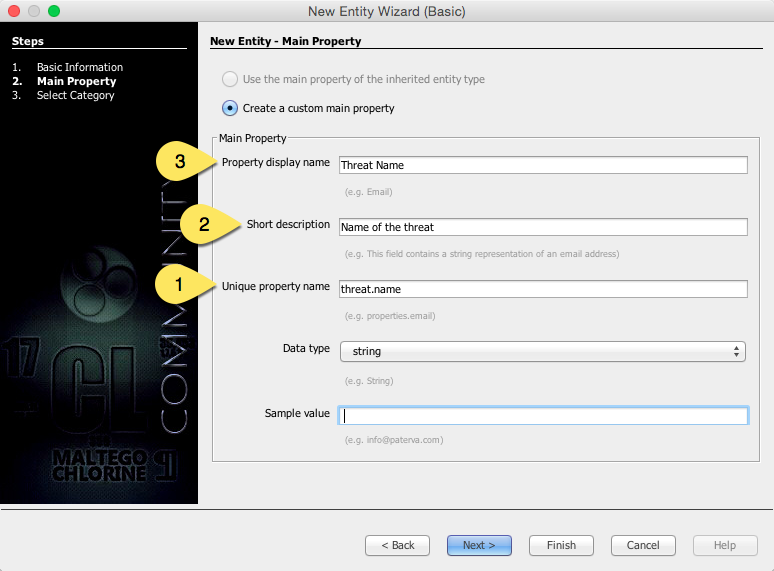
Maltego entity field code to GUI mappings
When adding an entity field using the entity editor the
name(1) anddisplay_name(3) mappings can be seen below: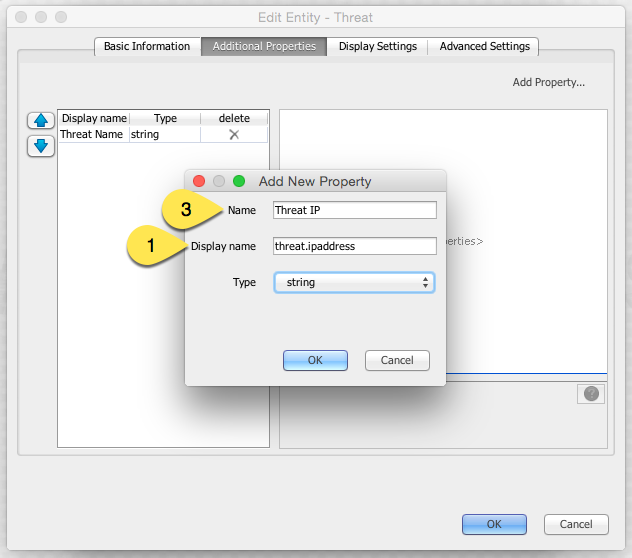
Adding a field using Maltego entity field editor
The field’s
description(2) can be set after an entity field is added by selecting the field from the left-hand pane and editing the field’s description in the right-hand pane of the “Additional Properties” tab in the Maltego entity editor.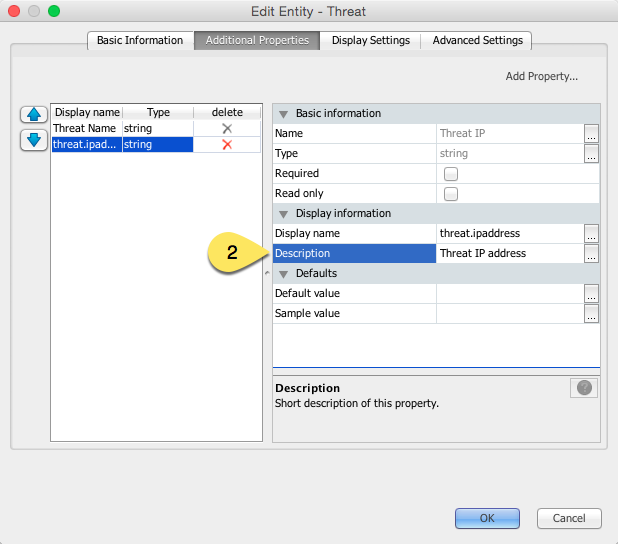
Setting the description of a new entity field.
Defining the entity fields in the figures above using Canari would result in the following code:
class Threat(Entity):
    name = StringEntityField('threat.name', display_name='Threat Name',
                             is_value=True, description='Name of the threat')
    ip_address = StringEntityField('threat.ipaddress', display_name='Threat IP',
                                   description='Threat IP address.')
Now let’s say we wanted to add the geographic location that the IP address originates from. We can do this manually but it would probably be easier to use an entity field decorator. First, we’ll add a
locationentity field:class Threat(Entity): name = StringEntityField('threat.name', display_name='Threat Name', is_value=True, description='Name of the threat') ip_address = StringEntityField('threat.ipaddress', display_name='Threat IP', description='Threat IP address.') location = StringEntityField('threat.location', display_name='Threat Location', description='Threat location.')
Next we need to create a decorator function that accepts two arguments: the entity object, and the new field value. We’ll use FreeGeoIP.net’s REST-based JSON web API to lookup location information for a particular IP address and apply it to the
ip_addressfield:import json from urllib2 import urlopen def geo_locate(threat, ip): threat.location = json.load(urlopen('https://freegeoip.net/json/%s' % ip))['country_name'] class Threat(Entity): name = StringEntityField('threat.name', display_name='Threat Name', is_value=True, description='Name of the threat') ip_address = StringEntityField('threat.ipaddress', display_name='Threat IP', description='Threat IP address.', decorator=geo_locate) location = StringEntityField('threat.location', display_name='Threat Location', description='Threat location.')
Let’s take a look at the decorator in action (there may be a delay if you’re on a slow network):
>>> t = Threat('foo', ip_address='4.2.2.1')
>>> print t.location
United States
The EnumEntityField and RegexEntityField types accept additional keyword arguments in their
constructors in addition to the arguments accepted by the StringEntityField type.
-
class
canari.maltego.message.EnumEntityField(name, choices=[], **extras)¶ Parameters: choices (iterable) – an iterable of choices for valid values the entity field will accept. Raises: ValueError – if choicesis empty orNone.In the event that an entity’s field is set to a value that is not specified in the
choiceskeyword argument, aValidationErrorwill be raised. Let’s add a threat level entity field to ourThreatentity to demonstrate the use ofEnumEntityFieldtypes:class Threat(Entity): # ... threat_level = EnumEntityField('threat.level', display_name='Threat Level', choices=[1,2,3,4,5], description='Threat level.')
Let’s see the
threat_levelfield in action:>>> t = Threat('foo', threat_level=1) >>> t.threat_level = 6 Traceback (most recent call last): ... ValidationError: Invalid value ('6') set for field 'Threat Level'. Expected one of these values: ['1', '2', '3', '4', '5'].
Note
EnumEntityFieldentity fields convert all objects in thechoicesiterable to strings using thestr()function.
-
class
canari.maltego.message.RegexEntityField(name, pattern='.*', **extras)¶ Parameters: pattern (str) – a regular expression pattern that gets used with re.match().Each time the field’s value is set or retrieved, a call to
re.match()is made with the specifiedpattern. If the value doesn’t match the pattern then aValidationErroris raised. Let’s add a threat identifier to our previous entity. We’ll require users to enter the threat ID using the following syntax'threat-0000':class Threat(Entity): # ... threat_id = RegexEntityField('threat.id', display_name='Threat ID', pattern='^threat-\d{4}$', description='Threat unique identifier.')
Let’s see the
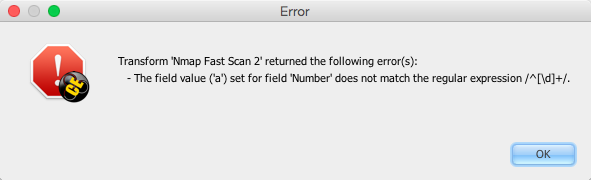
threat_idfield in action:>>> t = Threat('foo', threat_id='threat-0123') >>> t.threat_id = 'threat-12345' Traceback (most recent call last): ... ValidationError: The field value ('threat-12345') set for field 'Threat ID' does not match the regular expression /^threat-\d{4}$/. >>> t.threat_id = '12345' Traceback (most recent call last): ... ValidationError: The field value ('12345') set for field 'Threat ID' does not match the regular expression /^threat-\d{4}$/.
Customizing ValidationError Error Messages
You may have noticed that the error messages above are generic in nature. The good news is that you can specify a more
user-friendly error message for ValidationError exceptions by specifying the error_msg keyword argument in
your entity field definition. Error messages are formatted using the str.format() method and '{var}' string
notation. Each entity field type accepts the following string formatting arguments:
| Type | Error Message Arguments |
|---|---|
StringEntityField |
Not applicable. |
EnumEntityField |
field, value, expected |
IntegerEntityField |
field, value |
BooleanEntityField |
field, value |
FloatEntityField |
field, value |
LongEntityField |
field, value |
DateTimeEntityField |
field, value |
DateEntityField |
field, value |
TimeSpanEntityField |
field, value |
RegexEntityField |
field, value, pattern |
ColorEntityField |
field, value |
For example, if we wanted to modify the threat_level entity field’s (of type EnumEntityField)
default error message in our previous example, we can do this like so:
class Threat(Entity):
            # ...
            threat_level = EnumEntityField('threat.level', display_name='Threat Level',
                                           choices=[1,2,3,4,5], description='Threat level.',
                                           error_msg='{field!r}: {value!r} not in {expected!r}.')
Then our error message would look like this when we encounter a ValidationError exception:
>>> t = Threat('foo', threat_level=1)
>>> t.threat_level = 6
Traceback (most recent call last):
    ...
ValidationError: 'Threat Level': '6' not in ['1', '2', '3', '4', '5'].
See also
For a comprehensive overview of string formatting syntax, see the Format String Syntax section in the official Python documentation.
Creating Custom Entity Field Types
Entity field types are glorified Python property objects
and subclasses of the StringEntityField type. You can either subclass StringEntityField directly, or
leverage one of the many other entity field types available to you and augment their constructors, getters, and setters
as required. Let’s take a look at how we can create a
digest entity field that expects hash values in ascii hex
format using the RegexEntityField type:
class DigestEntityField(RegexEntityField):
    def __init__(self):
        super(DigestEntityField, self).__init__('content.digest', pattern='^[A-Fa-f0-9]$',
                                                description="The message's digest.",
                                                display_name='Message Digest',
                                                error_msg='{field!r}: invalid message digest: {value!r}!')

class Document(Entity):
    digest = DigestEntityField()

class DataPacket(Entity):
    digest = DigestEntityField()
This can significantly simplify and centralize refactoring efforts on entity fields in cases where the same entity field definition is reused in many other unrelated entity types. Alternatively, you can follow this template if you wish to implement something a bit more complex for field value validation:
class MyEntityField(StringEntityField):

    error_msg = 'A default error message with {field} and {value} and other variables if you wish.'

    def __init__(self, name, **extras):
        super(MyEntityField, self).__init__(name, **extras)
        # TODO: store any extra attributes that are not handled by StringEntityField.

    def __get__(self, obj, objtype):
        value = super(RegexEntityField, self).__get__(obj, objtype) # get field value
        # TODO: type conversions if necessary
        self.validate(value)
        return value

    def __set__(self, obj, value):
        # TODO: type conversions if necessary
        self.validate(value)
        super(RegexEntityField, self).__set__(obj, value) # set field value

    def validate(self, value):
        is_valid = True # TODO: implement some sort of validation
        if not is_valid:
            raise ValidationError(self.get_error_msg(self.display_name or self.name, value))
Adding Additional Information to Entities
Sometimes you want to display additional information to users. Either because it doesn’t fall into one of the entity’s
predefined fields or it’s just informational data that isn’t required for subsequent transform requests. For these use-
cases, Canari provides two classes, Field and Label, that can be used to define dynamic entity fields
and read-only information, respectively.
Field is the underlying data container for all the entity field types mentioned in the previous sections,
above. In fact, if you took a look at the fields attribute in an Entity object, you’d notice the
presence of this objects in a dictionary. As mentioned earlier, StringEntityField and friends are merely
proxies to the fields dictionary. A field object can be constructed in the following manner:
-
class
canari.maltego.message.Field(name, value, display_name='', matching_rule=MatchingRule.Strict)¶ Parameters: - name (str) – the unique field identifier, usually in dotted form (i.e. ‘threat.name’)
- value (str) – the value of the field or property.
- display_name (str) – the user-friendly name of the field (i.e. ‘Threat Name’)
- matching_rule (MatchingRule) – the matching rule for this field, either
MatchingRule.Strict(default) orMatchingRule.Loose.
See also
Matching rules for more information on matching rules and how they relate to Maltego graph behavior.
Fields that are pre-defined (or statically defined) for a particular entity in Maltego do not require the specification
of the display_name argument. The display name defined in Maltego will be used instead. The display_name
argument is particularly important for dynamic fields (fields that are not part of the entity definition in Maltego).
If omitted, and the field is dynamic, Maltego will name the field “Temp” in the “Properties View” pane. Dynamic fields
can be attached to entities in Canari in the following manner:
>>> from canari.maltego.entities import *
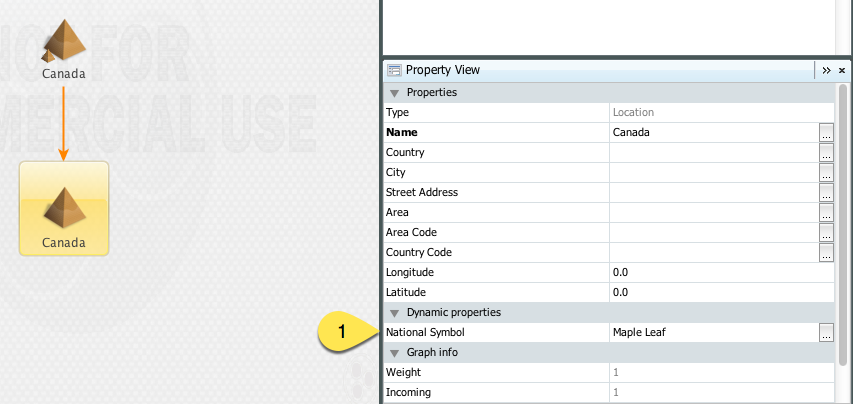
>>> l = Location('Canada')
>>> l += Field('location.symbol', 'Maple Leaf', display_name='National Symbol')
In the example above, we’ve added a previously undefined field, ‘location.symbol’, and added it to the builtin
Location entity in Maltego. The figure below illustrates the look and feel of a dynamic property (1) in
Maltego:
Dynamic entity field/property
Like static fields, dynamic fields get passed to transforms as input. Retrieving a dynamic field from a transform is as
simple as accessing the entity’s fields attribute. Continuing from our last example:
>>> print l['location.symbol'].value
Maple Leaf
Note
Dynamic field values are always return as an instance of str and need to be manually marshalled into their
appropriate types and validated, if necessary.
Now, let’s say we wanted to attach additional information to the entity that we do not want to pass as transform input. Labels serve this purpose and allow transform developers to set both text- and HTML-based content in the Maltego “Details View” pane.
Entity labels in “Detail View”
Label objects can be constructed in the following manner:
-
class
canari.maltego.message.Label(name, value[, type='text/text'])¶ Parameters: - name (str) – The title or name of the label.
- value (str) – The content that will appear under the label’s name.
- type (str) – A MIME type identifying the content’s type; either
'text/text'(default) or'text/html'.
Adding labels to an entity is the same as adding dynamic fields:
>>> t = Threat('Cheese', country='Switzerland')
>>> t += Label('Age', '12 years')
By default, fields are rendered as regular text. If you want to render HTML in the “Details View” you can do so by
setting type to 'text/html' and value to an HTML fragment, like so:
>>> t = Threat('Cheese', country='Switzerland')
>>> t += Label('Table', '<table><tr><th>header</th></tr><tr><td>row</td></tr></table>', 'text/html')
Matching Rules and Maltego
Maltego supports the concept of matching rules for entity fields. A matching rule defines how an output entity (returned
by a transform) is merged with other pre-existing entities, of the same type, that share the same entity value.
Maltego currently supports two matching rules, loose and strict matching, which are represented in Canari with the
MatchingRule.Loose and MatchingRule.Strict attributes, respectively. Take a look at how the behavior of
these two matching rules differ when used to compare two entities (x and y) of the same type:
| Value | Meaning |
|---|---|
MatchingRule.Strict |
if x.value == y.value and x.field == y.field then allow entities to merge. |
MatchingRule.Loose |
if x.value == y.value then x.field = y.field and merge entities. |
Attention
It is important to note that with loosely matched entity fields, the previous value is overridden with the new value for that field. If you wish to preserve the different values for particular entity field, then you will have to revert to strict matching.
Automatically Generating Canari Entity Definitions
Entity definitions can be automatically generated using the canari generate-entities command. In order to automatically generate entity definitions, you will have to perform the following steps:
Export your custom entities from Maltego using the “Export Entities” wizard and save the profile as
entities.mtzunder the<project name>/src/<project name>/resources/maltego/project folder.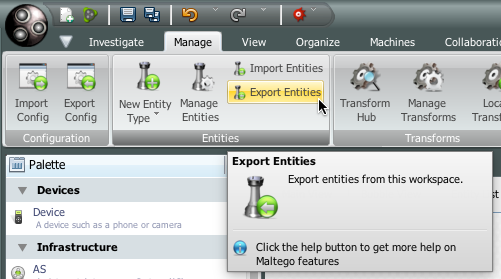
Export Entities button
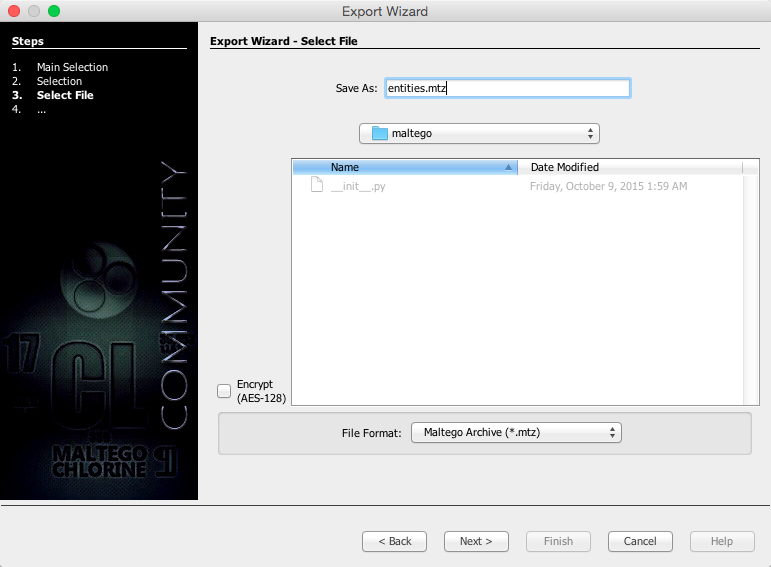
Saving entities.mtz to
<project name>/src/<project name>/resources/maltego/Run canari generate-entities in your project folder; this will generate an
entities.pyfile in<project name>/src/<project name>/transforms/common/. Here’s an example of the command in action when running it for a transform package named “foo”:$ canari generate-entities 'foo/transforms/common/entities.py' already exists. Are you sure you want to overwrite it? [y/N]: y Generating 'foo/src/foo/transforms/common/entities.py'... Parsing entity definition Entities/name.Foo.entity... Generating entity definition for Entities/name.Foo.entity... done.
In the command above we are completely overwriting the entities.py file since we have not defined any entities yet. This will usually be the normal course of action for most transform developers when importing entities into Canari for the first time. However, if you have performed this action before and would like to simply update the pre-existing
entities.pyfile then you can pass the-aparameter to canari generate-entities, like so:$ canari generate-entities -a Discovered 2 existing entities, and 1 namespaces... Appending to '/Users/ndouba/tools/canari3/foo/src/foo/transforms/common/entities.py'... Parsing entity definition Entities/name.Foo.entity... Skipping entity generation for name.Foo as it already exists... done.
The canari generate-entities command is capable of identifying and skipping over entities that have already been defined in your existing
entities.pyfile.Finally, edit the
entities.pyfile to your liking (i.e. perhaps change the name of a property to something more memorable).