Canari Quick Start
Welcome to the Canari Framework - the world’s most advanced rapid transform development framework for Maltego. In this quickstart tutorial we’ll go over how you can take advantage of Canari’s powerful feature set to create your own Maltego transform package. We’ll start by developing a local transform package and then migrate that over to a remote transform package which you can distributed via the Paterva TDS. Enough jibber jabber and let’s get this show on the road.
Installation
Canari requires the following dependencies to get started:
Note
Canari does not support Python version 3.
Installing Dependencies
Linux Debian-based
On Debian-based (Ubuntu, Kali, etc.) systems, all these dependencies can be installed using apt-get:
$ sudo apt-get install python2.7 python-virtualenv python-setuptools
Linux - Fedora-based
On Fedora-based (Fedora, RedHat, CentOS, etc.) systems, all these dependencies can be installed using yum:
$ sudo yum groupinstall -y 'development tools'
$ sudo yum install zlib-devel bzip2-devel openssl-devel ncurses-devel sqlite-devel \
     readline-devel tk-devel gdbm-devel db4-devel libpcap-devel xz-devel python-devel
$ sudo easy_install virtualenv
Mac OS/X
On Mac OS/X, make sure to install Xcode from the App Store, first. Then install the command-line tools like so:
$ sudo xcode-select --install
$ wget https://pypi.python.org/packages/source/s/setuptools/setuptools-18.4.tar.gz
$ tar -zxvf setuptools-18.4.tar.gz
$ cd setuptools-18.4 && sudo python setup.py install
$ sudo easy_install virtualenv
Installing Canari
Once you have all your dependencies installed, you can now install Canari. We recommend creating a virtual environment to reduce clutter in your default Python site-package directory. Virtual environments can be created easily like so:
$ virtualenv canari3
New python executable in canari3/bin/python
Installing setuptools, pip...done.
This will create a completely separate Python environment in the canari3 directory, which you can use to install
custom Python libraries to without the risk of corrupting your default Python environment. Another advantage to virtual
environments is that they can be easily cleaned up if you no longer need them. To activate your virtual environment, do
the following:
$ source canari3/bin/activate
$ which python
canari3/bin/python
Attention
Virtual environments need to be activated every time you create a new terminal session. Otherwise, you’ll be using
the default Python installation. You can automate this process by adding the source statement above in your
.profile or .bashrc file.
Once you’ve activated your virtual environment, it is now time to install Canari:
$ pip install canari
Note
One of the advantages of virtual environments is that you no longer have to use sudo to install custom Python modules.
Now you’re all set to get started developing your first transform package!
Hello World!
Let’s start by creating our first transform package. This will include an example “Hello World!” transform for your convenience. To create a transform package we use the canari commander like so:
$ canari create-package hello
creating skeleton in hello
--> Project description: My first transform package

--> Author name [ndouba]:

--> Author email: myemail@foo.com

done!
$
The create-package commandlet creates the skeleton for your transform package. It starts off by asking you some
standard information about the package and uses that information to populate authorship information in your transform
code.
Note
The canari commander has many other commandlets that you can take advantage of. For a full list of commands take a look at the output of canari list-commands.
If your transform package was successfully created, you should now see a hello folder in your working directory:
$ ls
hello ...
Let’s drop into that directory and run our first transform. As mentioned earlier, each time you create a new transform package, a “Hello World!” transform gets created for your reference. We’ll execute this transform using the canari debug-transform transform runner:
$ cd hello/src
$ canari debug-transform hello.transforms.helloworld.HelloWorld Bob
`- MaltegoTransformResponseMessage:
  `- UIMessages:
  `- Entities:
    `- Entity:  {'Type': 'maltego.Phrase'}
      `- Value: Hello Bob!
      `- Weight: 1
    `- Entity:  {'Type': 'maltego.Phrase'}
      `- Value: This way Mr(s). None!
      `- Weight: 1
    `- Entity:  {'Type': 'maltego.Phrase'}
      `- Value: Hi None!
      `- Weight: 1
You’ll probably see the output above and you may be wondering why are we seeing None in places where we’d expect to
see Bob. This is because the example transform also demonstrates the use of transform fields. Go ahead and open the
transform in your favorite text editor located at src/hello/transforms/helloworld.py - you should see the following:
class HelloWorld(Transform):
    # The transform input entity type.
    input_type = Person # <------------------------------------------------ 1

    def do_transform(self, request, response, config):
        person = request.entity
        response += Phrase('Hello %s!' % person.value)
        response += Phrase('This way Mr(s). %s!' % person.lastname) # <---- 2
        response += Phrase('Hi %s!' % person.firstnames) # <--------------- 3
        return response
In our example, the HelloWorld transform expects an input type of Person (1). If we look in
HelloWorld.do_transform() we see that it references the person.lastname (2) and person.firstnames (3)
entity fields. Let’s pass these fields to our transform runner:
$ canari debug-transform hello.transforms.helloworld.HelloWorld Bob "person.lastname=Doe#person.firstnames=Bob"
`- MaltegoTransformResponseMessage:
  `- UIMessages:
  `- Entities:
    `- Entity:  {'Type': 'maltego.Phrase'}
      `- Value: Hello Bob!
      `- Weight: 1
    `- Entity:  {'Type': 'maltego.Phrase'}
      `- Value: This way Mr(s). Doe!
      `- Weight: 1
    `- Entity:  {'Type': 'maltego.Phrase'}
      `- Value: Hi Bob!
      `- Weight: 1
Note
In this case, the entity field names coincidentally matched the names in our code example above. However, this will
not always be the case. Take a look at the canari.maltego.entities file for a full set of builtin Maltego
entity definitions and their fields.
Now that we’ve run our first transform successfully and understand the use of transform fields, let’s create our first custom transform.
Your First Transform
Using the same package above, in our hello directory, let’s start off by creating a transform using the
canari create-transform commandlet, like so:
$ canari create-transform whatismyip
Creating transform 'whatismyip'...
done!
As you may have guessed already, we are going to write a transform that determines our current Internet IP address. Let’s use the free JSON API at ipify. First let’s make sure you can reach the server by clicking here or typing the following in your terminal:
$ curl 'https://api.ipify.org?format=json'
{"ip":"123.123.123.123"}
You should see something like the output above, except your IP address would appear in place of “123.123.123.123”. Great! Let’s write the transform with the following design principles:
- Our transform will expect a
Locationentity as input.- Our transform will return an
IPv4Addressentity as output.
Let’s go ahead and open our src/hello/transforms/whatismyip.py transform and implement the code:
from urllib import urlopen
import json

from canari.maltego.entities import IPv4Address, Location
from canari.maltego.transform import Transform
from canari.framework import EnableDebugWindow

@EnableDebugWindow
class Whatismyip(Transform):
    """Returns my Internet IP Address"""

    input_type = Location

    def do_transform(self, request, response, config):
        ip_json = urlopen('https://api.ipify.org?format=json').read() # <-- 1
        ip_address = json.loads(ip_json)['ip'] # <------------------------- 2
        response += IPv4Address(ip_address) # <---------------------------- 3
        return response # <------------------------------------------------ 4
The input_type class property tells Canari to expect an input entity of type Location. This ensures that the
transform will only appear in the context menu of a Location entity in Maltego (i.e. under the run transform menu
options). Here’s what’s going on line-by-line inside the do_transform():
- First we make our request to
ipifyand get our IP address as a JSON string- We parse the JSON we got from
ipify(i.e.{"ip":"123.123.123.123"}) and extract our IP address.- We then create an
IPv4Addressentity with the default value set to our IP address and append it to our response.- Finally we return the response to Maltego.
Let’s see if our transform is operating correctly:
$ cd src
$ canari debug-transform hello.transforms.whatismyip.Whatismyip Home
`- MaltegoTransformResponseMessage:
  `- UIMessages:
  `- Entities:
    `- Entity:  {'Type': 'maltego.IPv4Address'}
      `- Value: 216.48.160.29
      `- Weight: 1
Great! Let’s try this out in Maltego. First we need to create a profile that can be imported by Maltego to configure the transforms in the GUI:
$ canari create-profile hello
Looking for transforms in hello...
Package loaded.
Creating profile ~/hello/src/hello.mtz...
Installing transform hello.HelloWorld from hello.transforms.helloworld.HelloWorld...
Installing transform hello.Whatismyip from hello.transforms.whatismyip.Whatismyip...
Writing ~/hello/src/hello/resources/etc/hello.conf to /Users/ndouba/tools/canari3/build/hello/src/hello.conf
Updating ~/hello/src/canari.conf...
Writing transform set Hello to ~/hello/src/hello.mtz...
Writing transform set Canari to ~/hello/src/hello.mtz...
Writing server Local to ~/hello/src/hello.mtz

%%%%%%%%%%%%%%%%%%%%%%%%%%% SUCCESS! %%%%%%%%%%%%%%%%%%%%%%%%%%%

 Successfully created /Users/ndouba/tools/canari3/build/hello/src/hello.mtz. You may now import this file into
 Maltego.

 INSTRUCTIONS:
 -------------
 1. Open Maltego.
 2. Click on the home button (Maltego icon, top-left corner).
 3. Click on 'Import'.
 4. Click on 'Import Configuration'.
 5. Follow prompts.
 6. Enjoy!

%%%%%%%%%%%%%%%%%%%%%%%%%%% SUCCESS! %%%%%%%%%%%%%%%%%%%%%%%%%%%
This should have created a hello.mtz file in the directory where you ran the command. Let’s import this profile into
Maltego:
- Open Maltego.
- Click on the Maltego home button (big Maltego icon in the top left corner).
- Navigate to
Importthen click onImport Configuration- Select your
hello.mtzfile and accept the defaults in the wizard.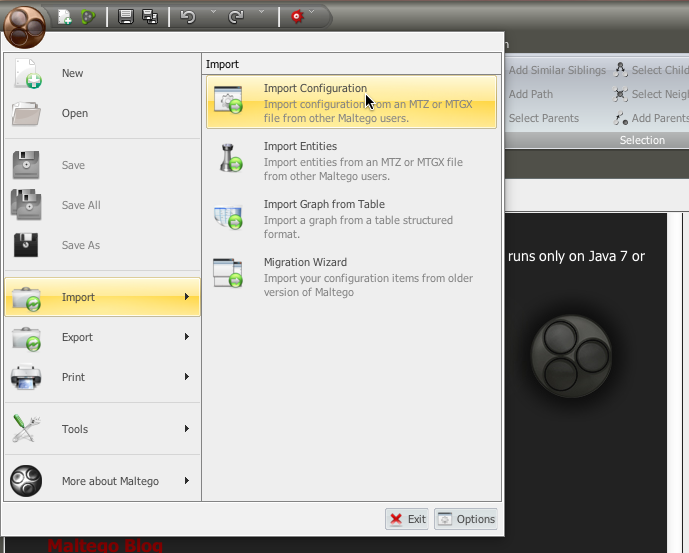
Maltego
Import Profilemenu option
Warning
Canari Maltego profile files are not redistributable. This is because the path of your local transforms and Canari
framework files will vary across systems. Instead, developers of local transforms should always include the Canari
create-profile instructions as part of the transform package’s installation steps.
Once you’ve successfully imported your profile, create a new graph and drag a Location entity onto the graph. Then
right click on the newly created Location entity, look for the Hello transform set, and click Whatismyip.
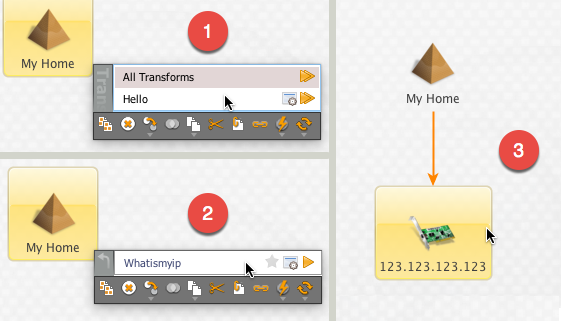
Maltego run transform steps
If all went well you should now see your IP address magically appear on the graph right below your Location entity.
Note
If you’re familiar with Canari v1 you may have noticed a few of Canari v3’s awesome features at work. One of them is
that the transform set and transform name in the Maltego UI are derived from the Canari package and transform names,
respectively. If you dig a little deeper, you may also notice that the transform description is derived from the
transform class’ __doc__ string property.
Let’s say you wanted to change the name of the transform as it appears in Maltego. There are two ways of doing this:
- You can adjust the transform class’ name into camel case (i.e.
WhatismyiptoWhatIsMyIP). This will tell Canari to insert a space between each uppercase letter in the transform’s name in Maltego.- You can set the transform class’
display_nameproperty to the label of your choice.
Let’s try it out by subclassing the Whatismyip and adding the following lines to the end of the
src/hello/transforms/whatismyip.py file:
class ToMyIP(Whatismyip):
    pass
After you’ve saved your changes, recreate your Maltego profile using the canari create-profile hello command,
re-import the configuration into Maltego, and run the transform like before. You should now see a To My IP transform
in the transform context menu.

Transform user-friendly name.
The previous example demonstrated the use of subclassing to reuse transform code. Subclassing a transform is useful when
you want to reuse transform logic that could be applied to other entity types as well. For example, say you have a nifty
threat intelligence transform that could be run on either an IP address or a DNS name. Instead of copying and pasting
the same code over and over again, you can simply implement it once, subclass the original transform, and adjust the
input_type property to the desired type in the child class. Let’s say we wanted ToMyIP in our previous
example to only apply to Phrase entities then we’d adjust the code, like so:
class ToMyIP(Whatismyip):
    # don't forget to import maltego.entities.Phrase
    input_type = Phrase
Finally, you may have noticed that we completely ignored the value of the input entity in this example. This is because our transform didn’t need to use your location’s name in order to get your IP address. Let’s create another transform, except this time we’ll use the information passed into the transform by the input entity.
Note
You may be wondering if you have to recreate and re-import Maltego profiles each time you make a transform change.
The answer is yes and no. If you are only updating the behaviour (i.e. body of the do_transform() method) of
your transform, the answer is no. However, if you want to adjust things such as the display name, the transform
class name, transform description, transform set name, then the answer is yes. Often times you will find yourself
recreating the profile and reinstalling it whenever you add or rename a transform in your package.
Working With Input Entities
Now that we know how to return entities to Maltego, let’s take a look at how to receive input. In this example we’ll use the FreeGeoIP JSON API to get the country, city, and region associated with an IP address. The transform will be designed with the following design principles:
- The transform will accept an
IPv4Addressas input.- The transform will return a
Locationentity as output.
First let’s create our transform by running canari create-transform IPToLocation in your terminal:
$ canari create-transform IPToLocation
Creating transform 'iptolocation'...
done!
Note
This time we’ve passed the name of the transform in camel case to the create-transform command to avoid having
to change it later.
Next, let’s edit the src/hello/transforms/iptolocation.py file and implement our transform logic:
import json
from urllib import urlopen

from canari.framework import EnableDebugWindow
from canari.maltego.entities import IPv4Address, Location
from canari.maltego.transform import Transform


@EnableDebugWindow
class IPToLocation(Transform):
    """Get's the city/country associated with a particular IP address."""

    # The transform input entity type.
    input_type = IPv4Address

    def do_transform(self, request, response, config):
        ip_address = request.entity.value # <----------------------- 1

        geoip_str = urlopen('https://freegeoip.net/json/%s' % ip_address).read()
        geoip_json = json.loads(geoip_str)

        l = Location()
        l.country = geoip_json.get('country_name', 'Unknown') # <--- 2
        l.city = geoip_json.get('city')
        l.countrycode = geoip_json.get('country_code')
        l.latitude = geoip_json.get('latitude')
        l.longitude = geoip_json.get('longitude')
        l.area = geoip_json.get('region_name')

        response += l
        return response
As you can see, the first line (1) in our do_transform() method retrieves the display value of our input entity
and stores it in the ip_address variable. The display value is the value that is shown below the entity’s icon in
the Maltego GUI. For example, the display value for an IPv4Address entity in Maltego is an IP V4 address
(i.e. 192.168.0.1). The request object is where all Maltego request information is stored and has the following
properties:
- The input entity and its fields are stored in the
entityproperty; its type is determined by the value of your transform’sinput_type.- The
parametersproperty returns a list of transform parameters. When Canari is operating in local transform mode, this property contains the unparsed command line arguments. In remote operating mode, the transform parameters passed in by the Maltego client are stored.- The
limitsproperty returns the transforms soft and hard limit. This property is not applicable in local transform mode as Maltego’s local transform adapter doesn’t pass in this information.
Next we issue our request to FreeGeoIP for the requested IP address and convert the JSON response into a python
dictionary. The Location entity is then initialized (2) and its respective field values are then set to the values
retrieved from our JSON object. Finally, we append the entity to our response object and return the output to
Maltego.
Note
The default value of a Location entity in Maltego’s GUI is calculated based on the values of the city and
country name entity fields. Therefore, setting a default value for a Location entity has no effect and is
unnecessary.
In our previous example, we illustrated how to set the values of our output entity’s fields using the property setters
(i.e. l.country = 'CA'). However, we can also set these entity fields by passing them in as keyword arguments. Let’s
refactor the code in the IPToLocation.do_transform() method to demonstrate this feature:
def do_transform(self, request, response, config):
    ip_address = request.entity.value

    geoip_str = urlopen('https://freegeoip.net/json/%s' % ip_address).read()
    geoip_json = json.loads(geoip_str)

    response += Location(
        country=geoip_json.get('country_name', 'Unknown'),
        city=geoip_json.get('city'),
        countrycode=geoip_json.get('country_code'),
        latitude=geoip_json.get('latitude'),
        longitude=geoip_json.get('longitude'),
        area=geoip_json.get('region_name')
    )

    return response
Let’s say we wanted to add a little more information or color to our graphs. Maltego supports both link and entity
decorations. Labels, colors, thicknesses and styles can be applied to the links or edges connecting the output
entities to their parent input entities. Entities can be bookmarked (or starred) and comments can be attached. Let’s add
a link label and bookmark the Location entity returned in our previous example:
def do_transform(self, request, response, config):
    # don't forget to add `from maltego.message import Bookmark`
    ip_address = request.entity.value

    geoip_str = urlopen('https://freegeoip.net/json/%s' % ip_address).read()
    geoip_json = json.loads(geoip_str)

    response += Location(
        country=geoip_json.get('country_name', 'Unknown'),
        city=geoip_json.get('city'),
        countrycode=geoip_json.get('country_code'),
        latitude=geoip_json.get('latitude'),
        longitude=geoip_json.get('longitude'),
        area=geoip_json.get('region_name'),
        link_label='From FreeGeoIP',
        bookmark=Bookmark.Orange
    )

    return response
Let’s take a look at the before and after difference:
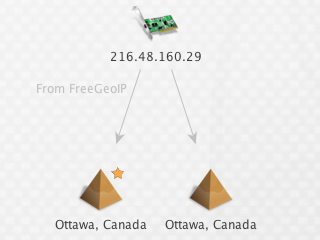
Entity with link label and bookmark (left) versus undecorated entity (right)
Finally, let’s add an icon to our output entity. Since we’re working with locations, we’ll set the output entity’s icon to the flag that corresponds with the country code:
def do_transform(self, request, response, config):
    # don't forget to add `from maltego.message import Bookmark`
    ip_address = request.entity.value

    geoip_str = urlopen('https://freegeoip.net/json/%s' % ip_address).read()
    geoip_json = json.loads(geoip_str)

    country_code = geoip_json.get('country_code').lower()

    response += Location(
        country=geoip_json.get('country_name', 'Unknown'),
        city=geoip_json.get('city'),
        countrycode=country_code,
        latitude=geoip_json.get('latitude'),
        longitude=geoip_json.get('longitude'),
        area=geoip_json.get('region_name'),
        link_label='From FreeGeoIP',
        bookmark=Bookmark.Orange,
        icon_url='http://www.geoips.com/assets/img/flag/256/%s.png' % country_code
    )

    return response
Now that we’ve covered the request and response parameters, let’s take a look at the config parameter and
how we can use it to make our transforms configurable.
Using Configuration Files
Now that you’re familiar with the request and response architecture in Canari, let’s make our transforms configurable.
Let’s assume we want to store the URL to our GeoIP API endpoint for our IPToLocation in a configuration file. First,
let’s open the src/hello/resources/etc/hello.conf file in a text editor. You’ll notice a bunch of default values in
the configuration file:
[hello.local]

# TODO: put local transform options here

[hello.remote]

# TODO: put remote transform options here
Just like an INI file in Windows, each Canari configuration file is made up of sections whose names appear within square
brackets ([, ]), and options that appear as name-value pairs under each section header (opt_name=opt_value).
Let’s add our FreeGeoIP endpoint URL configuration option in the configuration file:
[hello.local]

geo_ip_url=https://freegeoip.net/json/{ip}

[hello.remote]

# TODO: put remote transform options here
Now let’s refactor our IPToLocation.do_transform() code to query the configuration file for our API endpoint URL:
def do_transform(self, request, response, config):
    ip_address = request.entity.value

    url_template = config['hello.local.geo_ip_url'] # <------------ 1

    geoip_str = urlopen(url_template.format(ip=ip_address)).read()
    geoip_json = json.loads(geoip_str)

    country_code = geoip_json.get('country_code').lower()

    response += Location(
        country=geoip_json.get('country_name', 'Unknown'),
        city=geoip_json.get('city'),
        countrycode=country_code,
        latitude=geoip_json.get('latitude'),
        longitude=geoip_json.get('longitude'),
        area=geoip_json.get('region_name'),
        link_label='From FreeGeoIP',
        bookmark=Bookmark.Orange,
        icon_url='http://www.geoips.com/assets/img/flag/256/%s.png' % country_code
    )

    return response
As demonstrated, above, the config behaves just like a python dictionary; the keys are derived by appending the
option name to the section name using a period (.). We’ve now covered all the basics for local transform development
but what if we wanted to make our transforms remotely accessible?
Making Transforms Remote
If you’re using Maltego Chlorine or later, you will probably be familiar with the Transform Hub (figure below) that appears as soon as Maltego is opened in the “Home” tab. The transform hub provides access to transforms provided by several providers. These providers operate transform application servers that host remotely accessible transforms or remote transforms.

Maltego Transform Hub
Take a look at Paterva’s documentation on how remote transforms work. As can be seen in the figure below, remote transform requests are proxied via a transform distribution server (or TDS). The TDS hosts a Maltego configuration profile that can be imported into the client via a “seed” URL. The seed URL is unique to each set of remote transforms and can be created via the web-based TDS administration console.
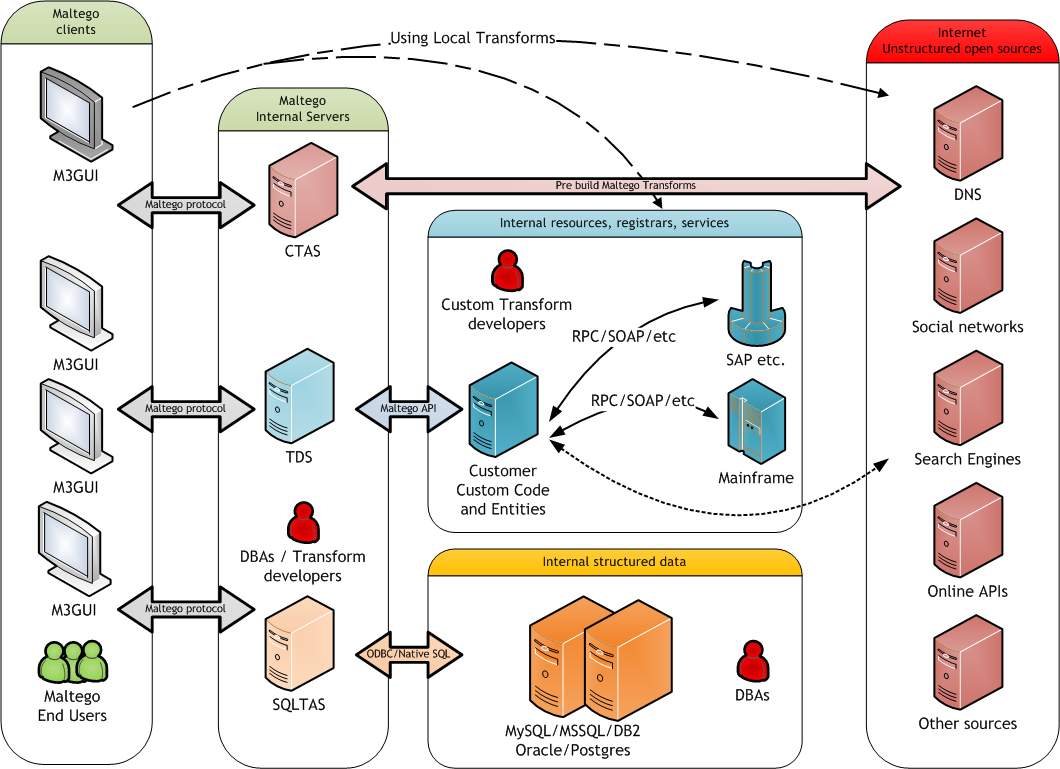
Maltego TDS infrastructure.
In order to run our transforms remotely, you need to have access to a TDS. You can either buy your own TDS from Paterva if you wish to keep your data private or use their public TDS. Since we’re not dealing with sensitive data in our examples, we’ll use the public TDS server. Before we start, you’ll need to register an account with Paterva’s public TDS. Once you’ve registered for a free account, login to make sure you can access the console.
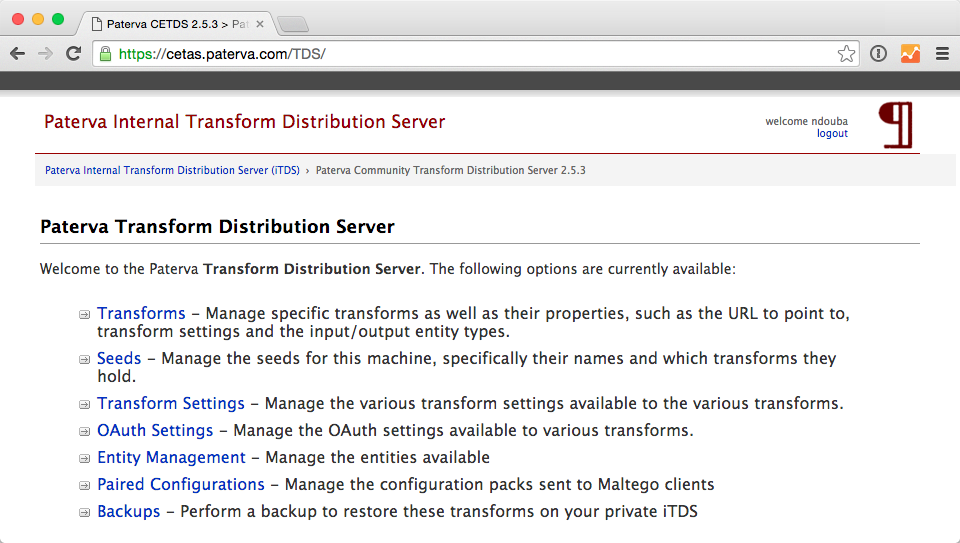
Paterva TDS console
Great! Now that you’re setup with a free TDS account, let’s go ahead and create our first seed:
Now that we’ve created our seed, we can now configure our remote transforms. First, we’ll setup our remote transform application server, Plume, on an Internet accessible system. Plume is Canari’s remote transform runner and can be used to host and execute the same transforms you wrote earlier with minor modifications to their code. Let’s take our IP to location transform and make it a remote transform:
import json
from urllib import urlopen

from canari.framework import EnableDebugWindow
from canari.maltego.entities import IPv4Address, Location
from canari.maltego.transform import Transform


@EnableDebugWindow
class IPToLocation(Transform):
    """Get's the city/country associated with a particular IP address."""

    # The transform input entity type.
    input_type = IPv4Address

    # Make our transform remote
    remote = True # <------------ 1

    def do_transform(self, request, response, config):
        ip_address = request.entity.value

        url_template = config['hello.local.geo_ip_url'] # <------------ 1

        geoip_str = urlopen(url_template.format(ip=ip_address)).read()
        geoip_json = json.loads(geoip_str)

        country_code = geoip_json.get('country_code').lower()

        response += Location(
            country=geoip_json.get('country_name', 'Unknown'),
            city=geoip_json.get('city'),
            countrycode=country_code,
            latitude=geoip_json.get('latitude'),
            longitude=geoip_json.get('longitude'),
            area=geoip_json.get('region_name'),
            link_label='From FreeGeoIP',
            bookmark=Bookmark.Orange,
            icon_url='http://www.geoips.com/assets/img/flag/256/%s.png' % country_code
        )

        return response
By simply setting the class property remote to True (1) we have now told Plume that this transform can be run
remotely. Now all we have to do is install Canari, Plume, and our transform package on the Internet-accessible server.
Follow the same steps to install Canari on your remote transform server as mentioned in the Installation section.
Now archive and upload your hello Canari package to the server and run the python setup.py install
script:
$ python setup.py sdist
$ scp dist/hello-1.0.tar.gz root@server:.
Note
Plume is only compatible with UNIX-based systems such as Linux, BSD, Darwin, etc. Windows support has not been implemented yet.
Run canari install-plume and step through the installation wizard on your server. You can simply accept all the defaults (in square brackets) by pressing enter. Here’s an example of a successful Plume install:
server$ canari install-plume
--> What directory would you like to install the Plume init script in? [/etc/init.d]:

--> What directory would you like to use as the Plume root directory? [/var/plume]:

--> What directory would you like to save Plume logs in? [/var/log]:

--> What directory would you like to save the Plume PID file in? [/var/run]:

--> What user would you like Plume to run as? [nobody]:

--> What group would you like Plume to run as? [nobody]:

--> What port would you like Plume to listen on? [8080]:

--> Would you like Plume to use TLS? [n]:

--> Canari has detected that you're running this install script from within a virtualenv.
--> Would you like to run Plume from this virtualenv ('~/venvs/canari') as well? [Y/n]:
Writing canari.conf to '/var/plume'...
done!
The Plume root directory (/var/plume) is where you will be running the canari load-plume-package or canari unload-plume-package commands. It’s also where the canari.conf file for Plume will be stored as well as any static resources your transform package may rely on. Make note of the path you used for the Plume root directory as we’ll be using it later:
server$ export PLUME_ROOT=/var/plume
Next, decompress your hello-1.0.tar.gz archive and run python setup.py install from within the hello/
directory. At this point all our dependencies have been installed and all we need to do is configure Plume to load the
Canari transform package:
server$ cd $PLUME_ROOT
server$ canari load-plume-package hello
Looking for transforms in hello...
Package loaded.
/var/plume/canari.conf already exists. Would you like to overwrite it? [y/N]:
Please restart plume for changes to take effect.
At this point, we are ready to go and all we have to do is run our init script (i.e. /etc/init.d/plume start) from the init script directory:
server$ /etc/init.d/plume start
Starting plume: non-SSL server
Looking for transforms in hello...
Package loaded.
Loading transform package 'hello'
Loading transform 'hello.IPToLocation' at /hello.IPToLocation...
done.
At this point what need to do is add our transform to our seed on the Paterva community TDS server:
Go back to the TDS console in your browser and login, if required.
Click on Transforms.
Click on Add Transform.
Set the following values:
- Transform Name to
IPToLocation.- Tranform UI Display to
IP To Location.- Transform URL to
http://<server IP or hostname>:<port>/hello.IPToLocation.- Select the
Paterva Entitiesradio button thenmaltego.IPv4Addressfrom the drop-down menu under Input Entity.- Select
MySeedfrom Available Seeds and click the>button.Finally, click Add Transform to add your transform to the seed.
Now for the moment of truth, copy the seed URL from the Paterva TDS console and add it to Maltego.